Nightwatch setup
1. Download Node js from – https://nodejs.org/download/ and install
2. Download Selenium server from http://docs.seleniumhq.org/download/
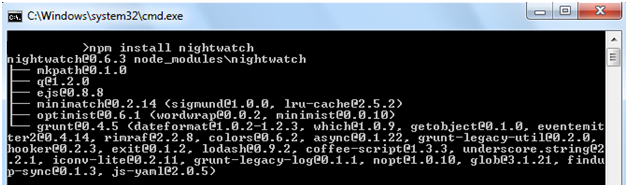
3. Navigate to any directory and download nightwatch from command line
npm install nightwatch
4. Create the following folder structure –

Where “Project” is the root directory
5. Now copy the nightwatch folder (which was downloaded by cmd) and place it – “Project/lib/nightwatch” path
6. Open Node directory (example – C:\Program Files\nodejs\node_modules) . Copy “npm” folder and place it in “Project/lib/npm” directory
7. Place selenium-server-standalone-{VERSION}.jar in Project/lib/selenium
8. Create two blank folder “reports” and “tests” on root directory.
9. In root folder create configuration file (nightwatch.json) as mentioned in http://nightwatchjs.org/guide
{
  "src_folders" : ["tests"],
  "output_folder" : "reports",
  "custom_commands_path" : "",
  "custom_assertions_path" : "",
  "page_objects_path" : "",
  "globals_path" : "",

  "selenium" : {
    "start_process" : false,
    "server_path" : "",
    "log_path" : "",
    "host" : "127.0.0.1",
    "port" : 4444,
    "cli_args" : {
      "webdriver.chrome.driver" : "",
      "webdriver.ie.driver" : ""
    }
  },

  "test_settings" : {
    "default" : {
      "launch_url" : "http://localhost",
      "selenium_port"  : 4444,
      "selenium_host"  : "localhost",
      "silent": true,
      "screenshots" : {
        "enabled" : false,
        "path" : ""
      },
      "desiredCapabilities": {
        "browserName": "firefox",
        "javascriptEnabled": true,
        "acceptSslCerts": true
      }
    },

    "chrome" : {
      "desiredCapabilities": {
        "browserName": "chrome",
        "javascriptEnabled": true,
        "acceptSslCerts": true
      }
    }
  }
}
10. Create “nightwatch.js” file on root directory and place the following line –
require('E:/Project/lib/nightwatch/bin/runner.js');
11. Now navigate to “test” folder and write the following code and save it as “sample.js” –
module.exports = {
  'Demo test Google' : function (browser) {
    browser
      .windowMaximize()
      .url('http://www.google.com')
      .waitForElementVisible('body', 1000)
      .setValue('input[type=text]', 'nightwatch')
      .waitForElementVisible('button[name=btnG]', 1000)
      .click('button[name=btnG]')
      .pause(1000)
      .assert.containsText('#main', 'Night Watch')
      .end();
  }
};
12. Now open a cmd and navigate to the “E:\Project\lib\selenium” and run the server as
java -jar selenium-server-standalone-2.45.0.jar
Note : We can skip this step if we use the following configuration in our json file
"selenium" : {
    "start_process" : true,
    "server_path" : "lib/selenium/selenium-server-standalone-2.45.0.jar",
	"start_session" : true,
    "log_path" : "",
    "host" : "127.0.0.1",
    "port" : 4444,
    "cli_args" : {
      "webdriver.chrome.driver" : "",
      "webdriver.ie.driver" : ""
    }
  }
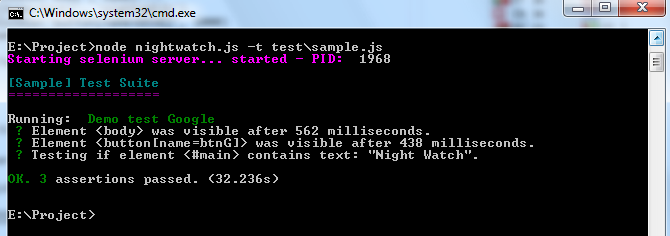
13. Now open another cmd and navigate to root directory – “E:\Project” and run the following code-
node nightwatch.js –t tests\sample.js
14. If everything goes well , the browser will open and the output should be looks like –

[screenshot has an error it must be “-t tests\sample.js”]
Note : If we skip step no 12 then the output should be –
The final root folder should looks like –

That’s it 🙂

how running in chrome?
Just change the config file –
add “browserName”: “chrome” like –
“test_settings” : {
“default” : {
“launch_url” : “http://localhost”,
“selenium_port” : 4444,
“selenium_host” : “localhost”,
“silent”: true,
“screenshots” : {
“enabled” : false,
“path” : “”
},
“desiredCapabilities”: {
“browserName”: “chrome”,
“javascriptEnabled”: true,
“acceptSslCerts”: true
}
}
and “webdriver.chrome.driver” : “lib/chromedriver.exe”, like –
“selenium” : {
“start_process” : true,
“server_path” : “lib/selenium/selenium-server-standalone-2.53.0.jar”,
“start_session” : true,
“log_path” : “”,
“host” : “127.0.0.1”,
“port” : 4444,
“cli_args” : {
“webdriver.chrome.driver” : “lib/chromedriver.exe”,
“webdriver.ie.driver” : “”
}
}
Hello,
You created a folder called ‘tests’ but in your instructions that the user needs to put in the CL to run the test is ‘test\sampletest.js’ when I think it should be ‘tests\sampletest.js’
Yes , You are correct ! It must be either ‘tests\sample.js’ or ‘test\sample.js’ for entire setup. Nice catch 🙂
Forgot to put the rest though……
you’re tutorial is one of the few that I was able to use to get everything up and running on a Windows machine.
Thank you so much!
Thank you!!!